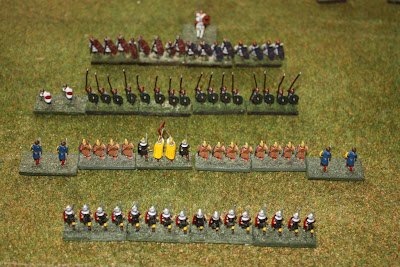
For the first refight of Zama using different rulesets, I thought this time I will get DBA out of the way first. Although not that fond of it, it is the most popular ruleset for less than 1 hour on a 2'x2' table. So it will offer some comparison for later rules.
Forces
Roman
1 Cv - Heavy Cavalry
4 LH - Light Cavalry
4 Ps - Velites
4 Bd - Hastati
4 Bd - Principes
2 Sp - Triarii (one with general)
4 Hd - Light Infantry
Carthaginians
1 Cv - Heavy Cavalry
2 Lh - Light Cavalry
2 El - Elephants
2 Ps - Skirmishers
4 Ax - Light Infantry
4 Sp - Medium infantry
4 Sp - Heavy Infantry (one with General)
A bit of a tough call on where to place the generals. So I put them at the back.
Deployment
As per my standard deployment map but rather than link to it, here it is:
Or a view from the top:
Setup - spotted that the Romans had 2 Cv during turn 1, but the extra base appears in this picture. And in DBA, generals are not separate but part of a unit. Fixed all this after this picture taken.
Special rules
Carthaginians will go first.
If it looks like the cavalry battle is going to end really fast, I may just stop them for a couple of turns. Note from post-game: I did not have to do this.
Also, the Numidian Light infantry cannot be activated until a Carthaginian comes within 6".
Victory will have to be when I call it as using the normal DBA breakpoint will not see the rear lines ever get into contact.
Tactics
The aim of the Carthaginians will be to prolong the cavalry clashes as long as possible. In the centre it will be to defeat the Roman lines, one by one. Strangely enough, the Roman plan is to hasten the cavalry clashes, and defeat the Carthaginians lines, one by one. Fairly straightforward. We will see how close to history we go.
Turn 1
The Carthaginians shuffle the lines forward; the Romans do also, and move forward the cavalry on both flanks. The Roman LH moves a double move with some spare PIPS. Light Horse use additional PIPs to make additional moves so long as it does not start of finish within a base width of an enemy. Both leave enough room between the skirmish line and the next line in to allow for recoils, flees etc.
Turn 2
Carthaginian elephant and skirmisher line charge the Velites. Outcome: all 4 Velites recoiled. All the Romans could do was charge their Numidian light horse into the Carthaginian Numidian Light Horse. It is a 4 Vs 2 battle. But the outcome was a Roman Light Horse recoiled. I am used to thinking in units and see the LH as a unit but the Roman LH is really 4 individual units and so next turn individual bases could wrap around the flanks which will turn recoils into destruction.
Elephant line about to clash with the Velites
Turn 3
Elephants and Skirmishers charge in again and the rest of the lines move further forward. One Elephant and Carthaginian Skirmisher lost, but a Roman Velite lost and another flees.The Carthaginian Numidians in contact result is the destruction of two Roman Light Horse; one in the Carthaginian turn, one in the Roman turn. This flank is not going so historical.
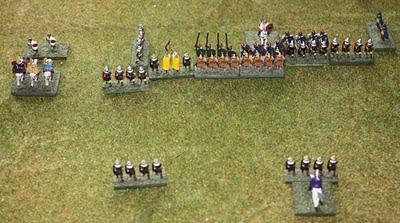
Light Horse flank - Roman LH on the sides, Carthaginian in the centre.
Turn 4 and 5
Turn 4 had PIP roll of one each - Elephant and skirmisher charge the Hastati, and are bounced.
Elephant charges in again. Roman Velites attack the Carthaginian first line. No damage, just a few recoils for each side.
Elephants with auxilia close behind (too close!). Two Velites defending on the right.
Turn 6 and 7
Elephant and Hastati clash again for no effect, except the elephant recoils into an Auxilia, destroying it. Wow! Historical outcome. I did have the first line about 80mm behind but the Roman Hastati moved forward to contact after a recoil, and the elephant recoiled again - into the Carthaginian first line. Carthaginian first line destroys a Velite.
Then the second (and last) Elephant is gone. Hastati move forwards, only 1 inch from the Auxilia now. 7 turns and only really the skirmisher line has contacted.
Overview at end of turn 7. Romans at the bottom.
Turns 8 and 9
Some re-arrangements of the front lines. Romans now have two Velites on each flank of the Hastati line - this will provide the valuable -1 modifier for attacks. This is one thing it is still hard for me to grasp about DBx, even after 15 years - the longevity of skirmishers. Especially compared to Armati where they are removed on contact with just about everything! Hastati destroy another 2 Light Infantry.
An aside on the cavalry flanks: Historically, the Romans won both flanks, pursued the enemy cavalry and returned near the end of the infantry battle to finish them off in the rear. In this refight, there is a stand-off between the two cavalry units as they are the same combat strength. And the Numidian light horse is now two units versus two units and so is quite equal - neither side wanting to press the issue and possibly give an advantage to either side. So, while I thought I may have to wave a hand to prevent the cavalry entering the infantry battle too soon, they may never actually enter...
Turn 10 and 11
The last Auxilia of the Carthaginian first line is destroyed. Thinking back, the tactic for the roman, and the Carthaginian, would be to extend the flanks with the psiloi and/or light infantry. The Romans did so with two of the fleeing Velites, and they have an advantage going up against the second Carthaginian line. This began to be a theme in later turns as the lines were extended to stop advantages.
The Hastati and the Carthaginian second line about to clash.
The lines meet...and the result is a few recoils on each side.
Turn 12
Next turn, a Velite turns onto the flank of a second line - it the Romans score a recoil, it will be destroyed. Which it is.
Carthaginians bring into the line their Cavalry on the flank (so much for my aside earlier) to gain an advantage - and manage to destroy the pesky Velite on the flank - now the Carthaginians have an advantage there. One of the Carthaginian veterans moves up to combat the Velite on the other flank, and recoils. Sometimes I have to stretch my imagination to understand DBA results.
Each of the the clashing line flanks fragments (but soon restored).
Turn 13 to 15
Romans split the Principes line to either side to support the flanks of the Hastati.
Carthaginians play the same trick as the Romans did earlier - wheeled a Skirmisher on the flank of a Hastati. Local advantage- a Spear with two supports Vs a Blade - 4 Vs 3. Spears win 10 to 9. Hastati cannot recoil and destroyed.
Romans bring their cavalry into the fray as well.
The line (much extended) meets again. The Spears recoil. The trick is trying to get a good enough local advantage - the Romans managed it by recoiling a few Spears leaving one lone Spear with two Roman supports beside it - making it a 5 vs 3. But just a recoil. Possibly the Romans can afford to close the door with some Blades as they have more of them. Will have to see.
The battle lines extended, with the advantage to the Romans.
Turn 16 to 18
The lines, which contains almost all the remaining troops with both sides also having a 2 unit reserve, clash.
The lines clash.
The line clash went on for a few more turns. The Carthaginian cavalry was destroyed first, making the Carthaginian right flank quite open. This was followed by the rightmost Spear unit next turn which is really leaving that flank open! And then another spear unit from both flanks. With the Carthaginians down to only 3 Spear unit, and the Romans having lost nothing, I called it a victory for the Romans.
The remainder of the lines. The three Carthaginians are centred on the general at the top.
Overview of the filed at game end.
Verdict
It was a long game - 18 turns! There is nearly twice the elements for a normal DBA games, and also the game is staged over three lines of troops. So it is unsurprising it took so long. I estimate there was at least 2 hours playing time. I think that DBA, compared to some of the other rules I'll try out, it not well suited to fast play when multiple lines are involved. Once again, as per the Callinicum DBA game, I did enjoy the game but found it not as historically representative as I like. Some things went quite historical - the Elephants impacting the Carthaginian first line, the Principes did help extend the line of the Hastati which is similar to parts of the original battle. The to and fro when the heavy troops clash is well represented. But the skirmishers hung around which still gets to me. I understand the reasoning, it just does sit comfortably with me. Still, a good game. There are others rules I like more so I think this will be my last solo DBA effort. If all the Zama refights take this long though, I am only going to replay it a few times before moving on to a different battle.


.jpg)


I am looking forward to your next Zama battle!!
ReplyDeleteJohn
It is hard for any game using chance elements to re-create events as they happened historically. To successfully do so would be extreme luck or an intentional recreation, rather than a game based upon historical terrain and orders of battle.
ReplyDeleteI think the result you got was quite plausible, especially if you did not know the battle and how it turned out. The fact that it did not work out exactly does not make it a bad simulation, just a bad recreation. :)
Keep up the good work Shaun.
Dale
Great stuff! I'm a DBA player, but have been very interested in your Might Armies Ancients suggestions, so can't wait to see this in MAA.
ReplyDeleteChris